
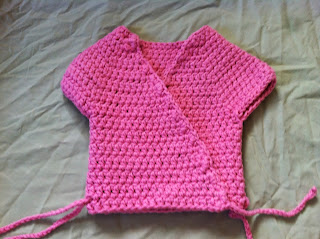
Crochet Baby Kimono Wrap Cardigan
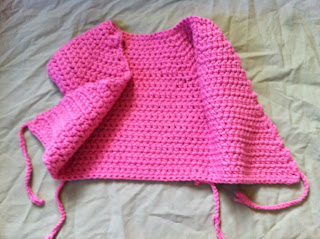
Here's a cute kimono style wrap cardigan with short sleeves. The wrap over style is convenient for babies in hospital as the wires, leads and IVs can be slipped underneath and come out through the wrap. It's made in one piece so no sewing required.
Here's the free pattern:
Size:
newborn, 14” chest
Materials:
I hook
#4 yarn
#4 yarn
Instructions:
Chain 30
Row 1: hdc 29, ch 1, turn.
Row 2: 2 hdc in first stitch, 2 hdc in next stitch, 1 hdc in each of the next 7 stitches, 2 hdc, 1 hdc in each of the next 9 stitches, 2 hdc, 1 hdc in each of the next 7 stitches, 2 hdc, 2 hdc in last stitch, ch 1, turn.
Row 3: 2 hdc in first stitch, hdc in each stitch, with 2 hdc in the middle of each 2 hdc of the previous row. End with 2 hdc in last stitch, ch 1, turn.
Repeat row 3 until the length between the second and third 2 hdc (measured from the middle hdc of the 2 hdc to the other middle hdc) is 9”. Ch 1, turn.
Row 4: (armhole row) 2 hdc in first stitch, hdc across to 2 hdc of row previous, skip all sts from the 2 hdc (in last row) to the next 2 hdc, hdc (first armhole made), hdc across to next 2 hdc (in last row), hdc (second armhole made), hdc across, end with 2 hdc in last stitch, ch 1, turn.
Row 5: 2 hdc in first stitch, hdc in each stitch across, end with 2 hdc in last stitch, ch 1, turn.
Repeat Row 5 until the diagonal parts of the left and right front panel are each only 2 stitches away from being the same width as the back panel of the kimono wrap.
Row 6: 2 hdc in first stitch, hdc in each stitch across until the left front panel is reached. Then hdc in next stitch, ch 1, skip 1 stitch and continue with hdc across, end with 2 hdc in last stitch.
Cardigan should measure approx 9 1/2” from shoulder to bottom hem. Repeat Row 6 if necessary.
Edging: With right side facing, ch 1, sc around, 3sc in outer corners, join with a sl st, fasten off and weave in ends.
Finishing: (Make ties) Join yarn to lower corner of the diagonal of the front panel and chain 25, fasten off and weave in ends. Repeat on other front panel, and one on each side edge. Four ties made.


Hi !!! I like this pattern very much....But row 3 is little confusing.Can u plz explain that again.I'm eagerly waiting for ur reply..
ReplyDeleteYou do 2 hdc in the first stitch. Then hdc in each hdc, and 2 hdc between each of the 2 hdc of the previous row. End with 2 hdc in last stitch, ch 1, turn.
ReplyDeleteSo you hdc across but when you get to the 2hdc from the previous row (there was 4 of them), you do 2hdc between the 2hdc of row 2. The 2hdcs are making the corners.
Let me know if that makes it clearer.
Thank you for this pattern,i am looking for clothes for preemie babies to donate to a hospital,and this is ideal.
ReplyDeleteYou're welcome. The hats are also appreciated at hospitals for preemie babies. I have a few different designs both in knit and crochet.
ReplyDeleteThanks for the lovely pattern. I am trying to make one for a one year old baby, how do you change the pattern to measure. I have a 100 chain. Thanks in advance
ReplyDeleteI'm sorry I haven't got a pattern for a bigger size in this.
DeleteLion Brand has a kimono shirt for 12 mo. old babies. It's free on their website.
DeleteThere is no row 7 but the instructions say to repeat row 7 if necessary!
ReplyDeleteRepeat Row 6 if necessary
DeleteI am trying your pattern and row 4 says hdc to 1st ch-1 space - where are the ch1 spaces?
ReplyDeleteI've edited Row 4:
DeleteRow 4: (armhole row) 2 hdc in first stitch, hdc across to 2 hdc of row previous, skip all sts from the 2 hdc (in last row) to the next 2 hdc, hdc (first armhole made), hdc across to next 2 hdc (in last row), hdc (second armhole made), hdc across, end with 2 hdc in last stitch, ch 1, turn.
I hope that makes it easier to understand.
Do you have more pictures showing each change? Pictures help everyone visualize the changes. I an trying to do the armholes but am confused as to what it looks like.
ReplyDeleteHi
ReplyDeleteI do not know if I'm stupid or what. I do not understand the second row.
There is only 3 panels,
Please help
In row 1 you HDC across all stitches.
DeleteIn Row 2 you 2 hdc in first stitch, then 2 hdc in next stitch, then 1 hdc in each of the next 7 stitches. 2 hdc in next stitch, then 1 hdc in each of the next 9 stitches. 2 hdc in next stitch, then 1 hdc in each of the next 7 stitches. 2 hdc in next stitch, and 2 hdc in last stitch, ch 1, turn.
Hope this helps.
Hello,
ReplyDeleteI am totally befuddled by the arm hole row (row 4). It seems I am suppose to skip stitches from the first joint (for lack of a better word) to the next - since that is what I assume 2 hdc (from previous row) to next 2hdc means? It seems I am attaching 4 different 2hdc points, but other than the end I only have 2. Is that correct? Please help!!
Row 4 makes the armholes by joining the work at two points.
ReplyDeleteYou have 4 places in row 3 where you made 2hdc.
So in row 4 you crochet 2hdc in the first stitch, then hdc across to the first 2hdc of the row below. Skip all sts from there to the next 2hdc and hdc in that stitch. Then hdc across to the next 2hdc of the row below and hdc in that stitch. hdc across and end with 2hdc in the last stitch, ch 1 and turn.
I feel I am missing something that must be obvious, so thank you for hanging in there with me.
DeleteThe 4 places in row 3 where I have 2hdc -
visually I see it as:
2Hdc1 xxxxxx 2Hdc2 xxxxxxxx 2Hdc3 xxxxxxx 2Hdc4
(not right # of stitches of course)
Row 4:
2hdc xxxxx 2hdc - skip - 2hdc xxxxxx 2hdc(this is the end of the piece) NOW WHAT? I don't see I have any where else to keep stitching.
Thanks again for the pattern and your help with this. :)
You have four sets of 2hdc in row 3. You join set one to set two by skipping the stitches between them. You then join set 3 and 4 by skipping the stitches between them. Then you turn at the end of the row and crochet back across the now shortened row that you have for row 5.
DeleteRow 2 the first such is 2hdc, then another 2hdc at the beginning of the row and then at the end of the row. Then row 3 says to 2hdc in first stitch, then do I do 2hdc in the middle of the next 2hdc? An I always doing 2hdc in the first stitch?
ReplyDeleteIn Row 2 you do 2 hdc in first stitch, then 2 hdc in next stitch, then 1 hdc in each of the next 7 stitches. 2 hdc in next stitch, then 1 hdc in each of the next 9 stitches. 2 hdc in next stitch, then 1 hdc in each of the next 7 stitches. 2 hdc in next stitch, and 2 hdc in last stitch, ch 1, turn.
ReplyDeleteIn Row 3: you do 2 hdc in first stitch, then 1 hdc in each stitch, until you get to the 2hdc from row 2. you do 2 hdc in the middle of that 2 hdc. So i hdc in each st except for 2hdc in the middle of the 2hdc of the previous row. End with 2 hdc in last stitch, ch 1, turn.
Repeat row 3 until you reach the correct length